OWNER'S MANUAL
LEIGH DAYTON WRIGHT SPA PREAMPLIFIER
Mark 1
![]()
DAYTON WRIGHT division of
LEIGH
![]()
Revised: Janoary 12, 1979

OWNER'S MANUAL
LEIGH DAYTON WRIGHT SPA PREAMPLIFIER
Mark 1
![]()
DAYTON WRIGHT division of
LEIGH
![]()
Revised: Janoary 12, 1979
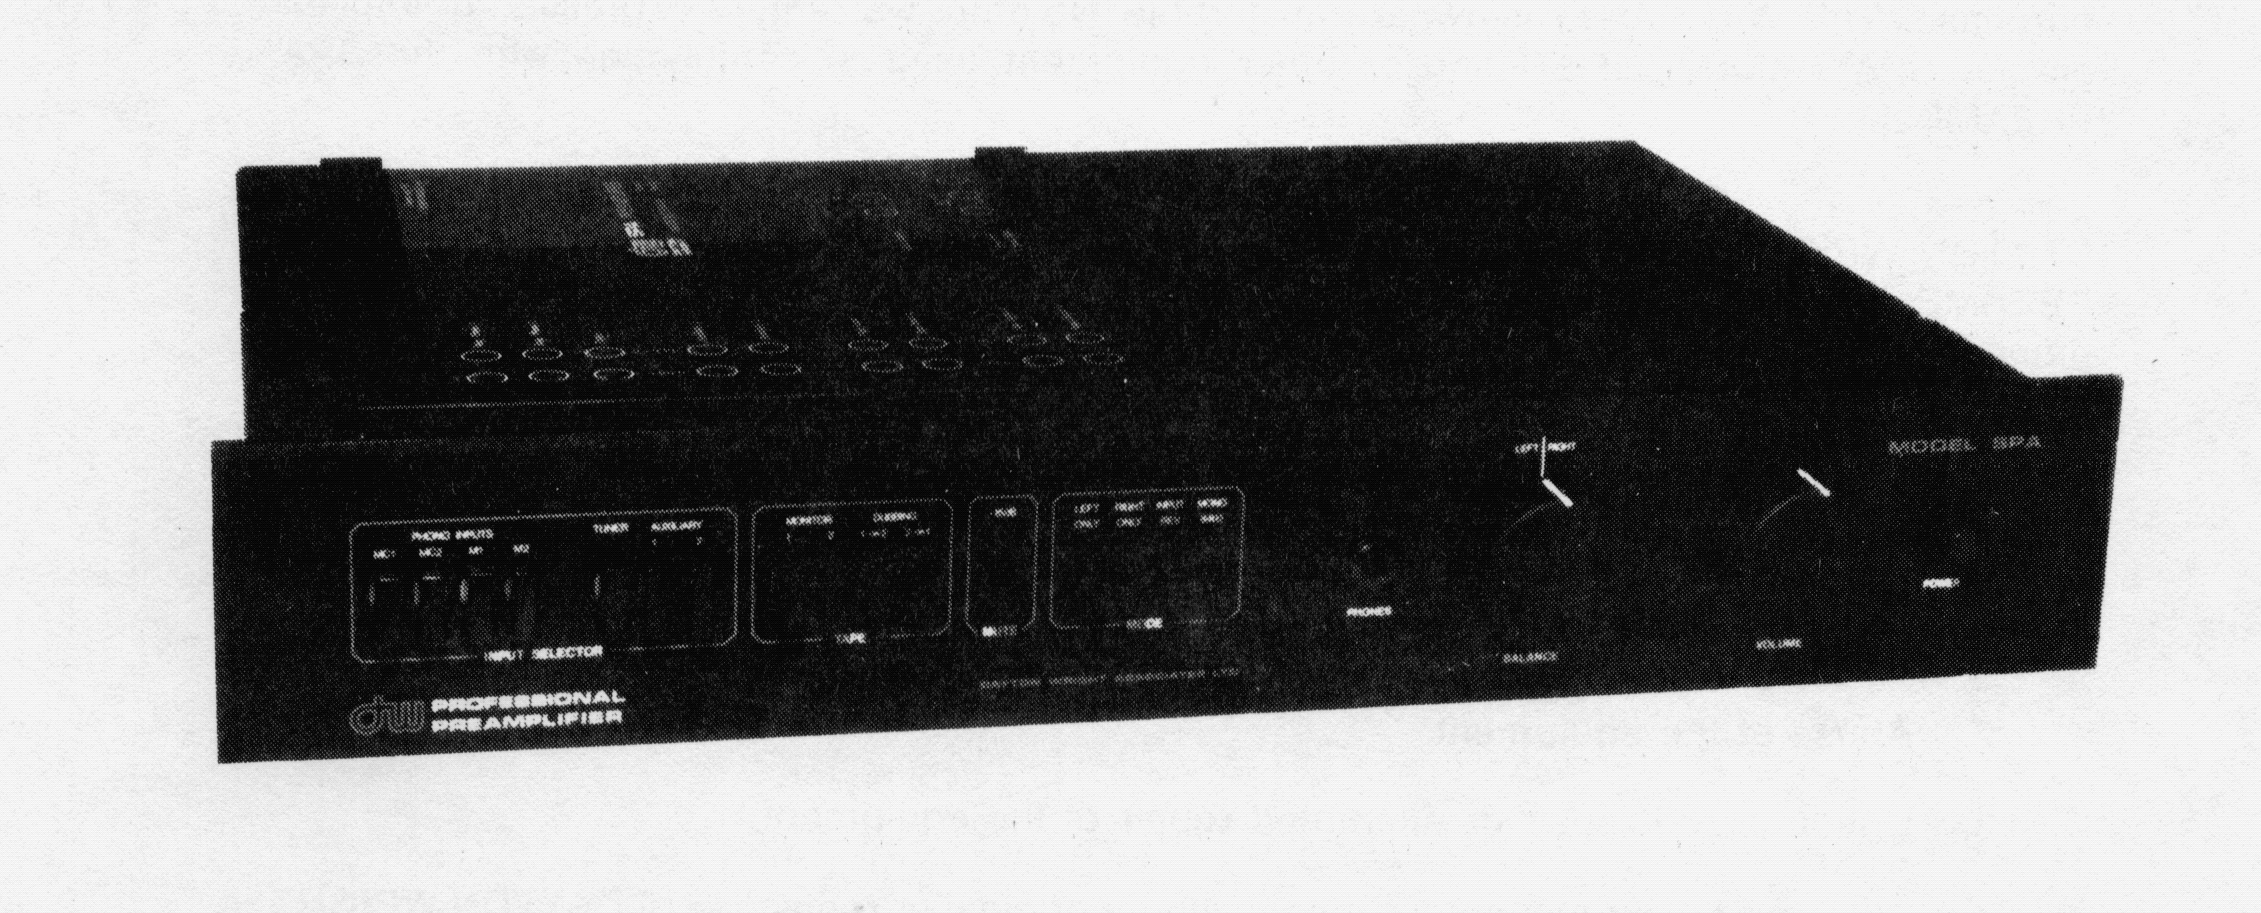
MODEL SPA
ultra high definition
basic preamplifier
with built-in optional
headamp for moving
coil cartridges
WARRANTY
DAYTON WRIGHT warrants the SPA PREAMPLIFIER to be free from original defects in parts and manufacture for a period of three (3) years from date of purchase. This WARRANTY is owner transferable. No other warranty is expressed or implied on the SPA PREAMPLIFIER and/or other equipment used in conjunction with the SPA PREAMPLIFIER.
DAYTON WRIGHT restricts its liability to the cash value of the SPA PREAMPLIFIER at time of purchase. No liability is assumed for injury, loss of time, and/or other damages.
The WARRANTY will be void by any of the following conditions:
1 . Failure to comply with the INSTALLATION AND OPERATING INSTRUCTIONS in this manual.
2. Abuse of the equipment.
3. Unauthorized repair or attempted repair of the equipment.
Exclusion for damage due to a lightening strike or power surge. Our warranty does not cover anything that is damaged by any incident like this. As transistors or other components may fail if subjected to a voltage spike, even after some months have passed, if we are called on to effect a repair, any such work will be excluded from any subsiquent warranty repair. It must be understood, in advance, that should we attempt a courtesy repair, tat it is NOT under any warranty whatsoever!
4. Shipping the equipment for repair without original or replacement DAYTON WRIGHT packaging.
Please contact your nearest authorized DAYTON WRIGHT dealer for service.
Units returned to the factory without authorization will not be repaired.
PURCHASER'S RECORD
Model: SPA M802A (with Headamp)
M802B (without Headamp)
TABLE OF CONTENTS
FOREWORD
Introduction
General Product Description
INSTALLATION AND OPERATING INSTRUCTIONS
1. Unpacking the Unit 3
2. SPA Power Module 3
3. SPA Main Unit 5
4. Appendix 13
LIST OF ILLUSTRATIONS
Fig. 1 SPA Packaging
Fig. 2 Power Supply
Fig. 3 Main Unit (Top View)
Fig. 4 Trimpot Setting for Headamps
Fig. 5 Location of Trimpots on Headamp Board
Fig. 6 SPA Truth Table
Fig. 7 SPA Block Diagram
Fig. 8 RF Filter
Fig. 9 Flow Chart
F O R E W O R D
INTRODUCTION
Dayton Wright welcomes you to its fine line of audio components. Your newly purchased product represents years of dedicated research, design, and refinement, encompassed by carefully thought out design goals and features. Every part and assembly in a Dayton Wright product is thoroughly inspected; every transistor and integrated circuit is hand selected in Dayton Wright designed test apparatus to meet our high standards for matched gain, low noise, and high stability; vigorous testing is performed at every stage of assembly, integrated with ample burn-in periods. Before being hand cleaned and packed, every product is actually played and listened to in a stereo system - an extra effort to insure that a product in perfect condition will reach you. All this in harmony with our basic, no frills approach to audio reproduction equipment, to bring you the highest attainable level of sonic accuracy possible.
IMPORTANT: Before using your Dayton Wright
product please take the time to read through
this manual and familiarize yourself with
the equipment This will enable you to set up your entire system correctly
the first time, and to help you take full advantage of its high quality
and features.
GENERAL PRODUCT DESCRIPTION
The Dayton Wright SPA preamplifier is an extremely flexible control centre for processing signals from a wide variety of sources which require preamplification. As many as four phono inputs, three high level inputs, and two tape recorders are accommodated and selected with ease via the controls provided, all of which are preamplified through Dayton Wright State-ofthe-Art circuitry. The result: a noticeably more complete and accurately detailed retrieval of your sources' musical information. When used with compatible components exceptional results should be immediately evident.
The SPA remote POWER MODULE feeds only D.C. voltages via the control cable to the MAIN UNIT, eliminating induced hum and noise encountered with A.C. control cables. All voltages are bridge rectified and generously filtered, as well as fully regulated with integrated circuits and heat sunk zener diodes. The control cable terminates into a "D-connector", located in a recessed area on top of the unit, as do all the phono sockets. These are hidden by a smartly silk-screened plexiglass cover, which serves as a guide to connections.
Preamplification is achieved through three separate amplifiers excelling in low TIMD (transient intermodulation distortion) and accurate "current mode" loading:
(1) a fully discrete cascode configuration for "moving-coil" type phono cartridges;
(2) a unique discrete differential bootstrapped cascode stage and integrated circuit phono amplifier combined with RIAA playback equalization for the more common "magnetic" type cartridge; followed by
(3) a dual voltage amplifier and voltage follower integrated circuit for "line level" gain of the previous and all other inputs. Ample switching facilities are provided to achieve easy selection of inputs, tape sources, cross-dubbing, and mode.
DETAILED PRODUCT DESCRIPTION
INSTALLATION AND OPERATING INSTRUCTIONS
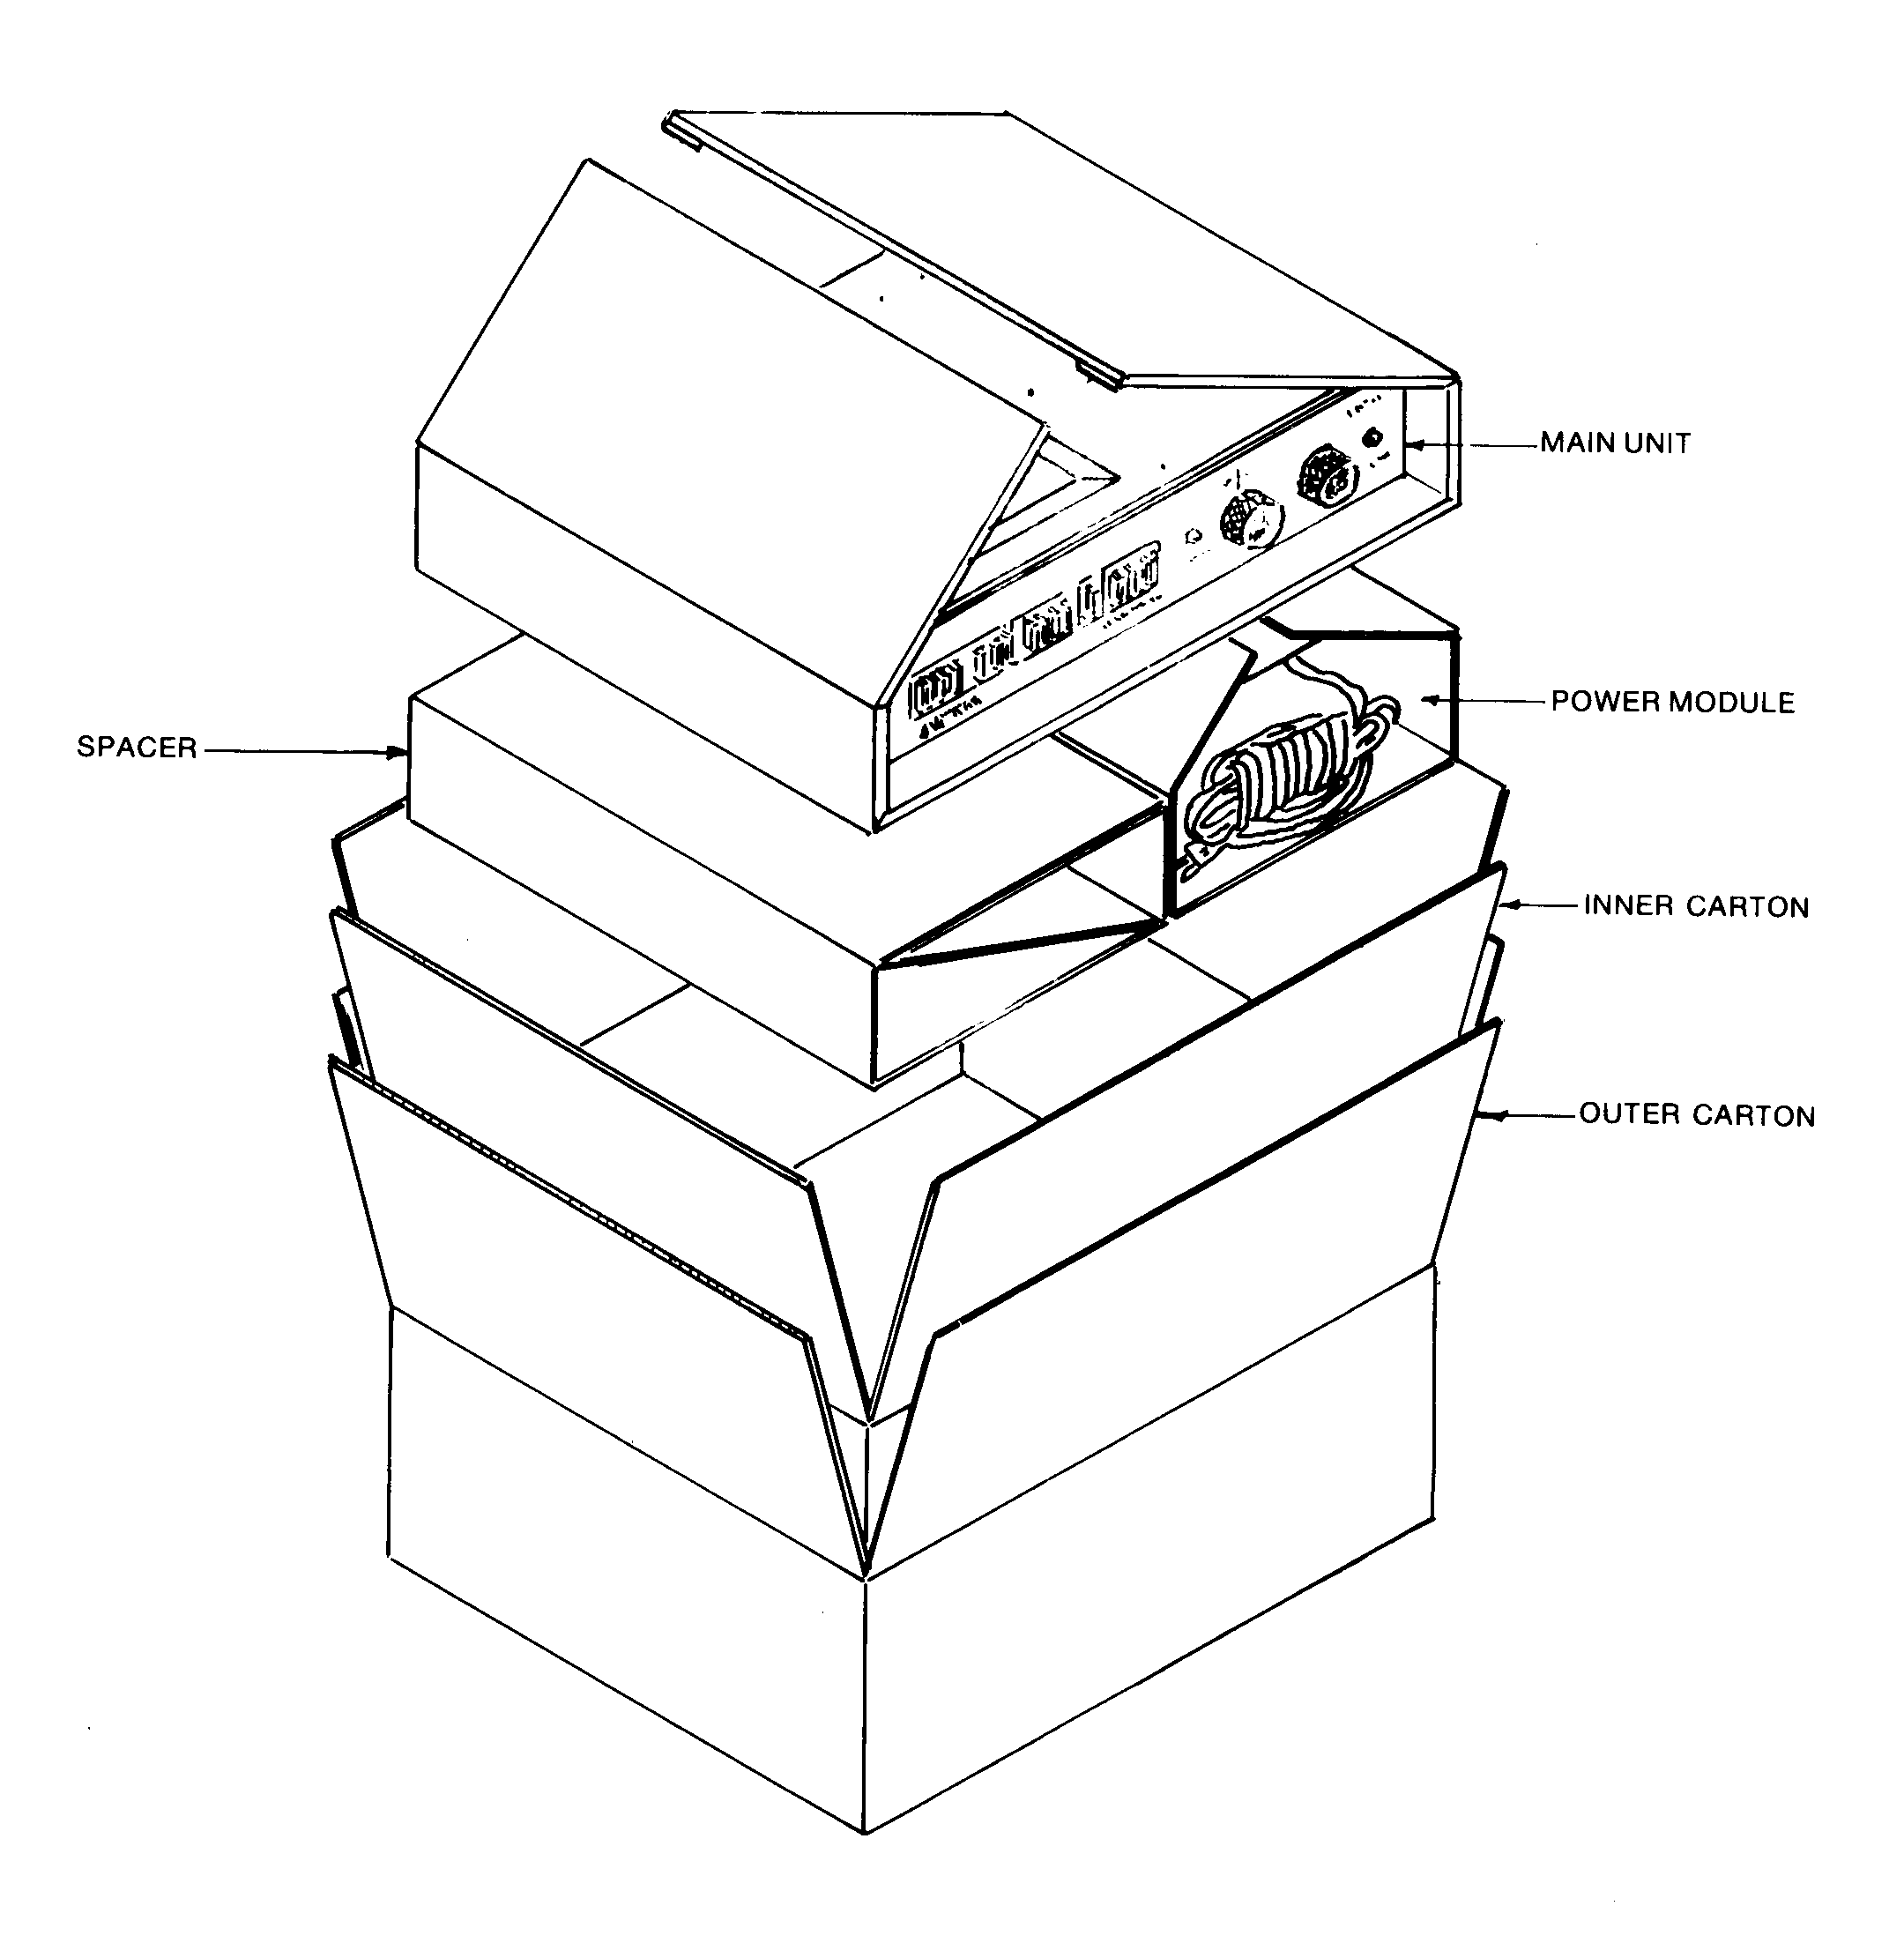
Fig. 1 SPA Packaging 2
1. UNPACKING THE UNIT
The SPA packaging has been specially designed to protect the unit from shipping abuse. It is suggested that you keep the packaging, should it ever become necessary to ship the unit. UNDER NO CIRCUMSTANCES SHOULD THE UNIT BE SHIPPED WITHOUT ITS PACKAGING. Please contact your dealer if you require a replacement set.
1.1 Carefully slit the tops of the outer and inner cartons, and lift all the flaps to expose an inner package. This contains the MAIN UNIT.
1.2 Remove the main unit package from the carton.
1.3 DO NOT ATTEMPT TO PULL THE UNIT THROUGH THIS SLEEVED PACKAGE. Open the sleeve and lift the MAIN UNIT out.
1.4 Carefully remove the plastic wrap.
1.5 From the carton remove the package containing the POWER MODULE. (The adjacent package serves only as a spacer.)
1.6 Open the sleeved package and lift out the POWER MODULE with attached A.C. cord and control cable.
1.7 Remove the plastic wrap.
1.8 Inspect the units for any external damage. If any, please report it to your dealer at once.
1.9 The cases are protected with a unique velvet finish which
is extremely durable and resistant to scratches. DO NOT APPLY OIL
OR FURNITURE POLISH TO THESE CASES. They may be easily cleaned with
a damp, lint-free cloth.
1.9.1 DAYTON WRIGHT SPA Mk I'S
1.9.2 CASE Finish - Black velvet finish

Fig. 2 Power Supply Module
2. SPA POWER MODULE
This unit houses the transformers and circuitry for the D.C. supply voltages. A heavy duty relay is D.C. activated by a switch on the SPA MAIN UNIT, which applies power to the SPA and switched A.C. outlets. There is a user accessible 115/230 V.A.C. mains slide switch, and an external fuse. The power transformer is thermally protected and will shut down temporarily if excessive current is drawn.
2.1 Set the "A.C. LINE VOLTAGE SELECTOR SWITCH" to either "l 15" or "230", depending on your voltage requirements. The "l 15" setting will work over a range of 95-135V; the "230" setting will work over a range of 190-27OV; 50 or 60 Hz operation is acceptable with either setting.
2.1.2 The line cord may now be plugged into a wall outlet.
2.2 A.C. OUTLETS
2.2.1 There are four SWITCHED A.C. OUTLETS on the POWER MODULE rated "800 WATTS MAX.". The total power drawn by equipment plugged into these switched outlets should not exceed 800 watts, or approximately 6.6 amperes at 120 V.A.C.
2.2.2 Power will be supplied to the switched outlets when th@ power switch on the SPA MAIN UNIT is depressed.
2.2.3 There are two UNSWITCH ED A.C. OUTLETS, rated "400 WATTS MAX". The total power drawn by equipment plugged into these unswitched outlets should not exceed 400 watts or approximately 3.3 amperes at 120 V.A.C.
2.2.4 Power is supplied to the unswitched outlets as soon as the POWER MODULE A.C. line cord is plugged in.
2.2.5 You may plug in associated equipment to these outlets to suit your requirements, so long as you do not exceed the wattage ratings. Theoretically, some power amplifiers could be accommodated via a switched outlet, as the A.C. mains relay is rated at 1 0 amperes. In practice, however, it is suggested that you plug your power amplifier directly into a wall outlet. This is stressed for three reasons: (1) Heavy surge demands from the power amplifier are more easily afforded via direct connection to a wall outlet; (2) Swinging A.C. line variations between preamplifier and power amplifier will be minimized; (3) The possibility of ground loops (leading to numerous undesirable conditions) will be minimized.
2.3 PLACEMENT OF THE POWER MODULE
2.3.1 One should bear in mind that the SPA MAIN UNIT contains highly sensitive phono circuitry, and that all source equipment, along with interconnecting cables to these stages, is susceptible to hum and noise pick-up.
2.3.2 Keep the -POWER MODULE at least three feet from the SPA
MAIN UNIT, source equipment, and signal carrying cables; otherwise hum,
noise, and RF interference may be encountered. See APPENDIX, Section
4.2, 4.3.
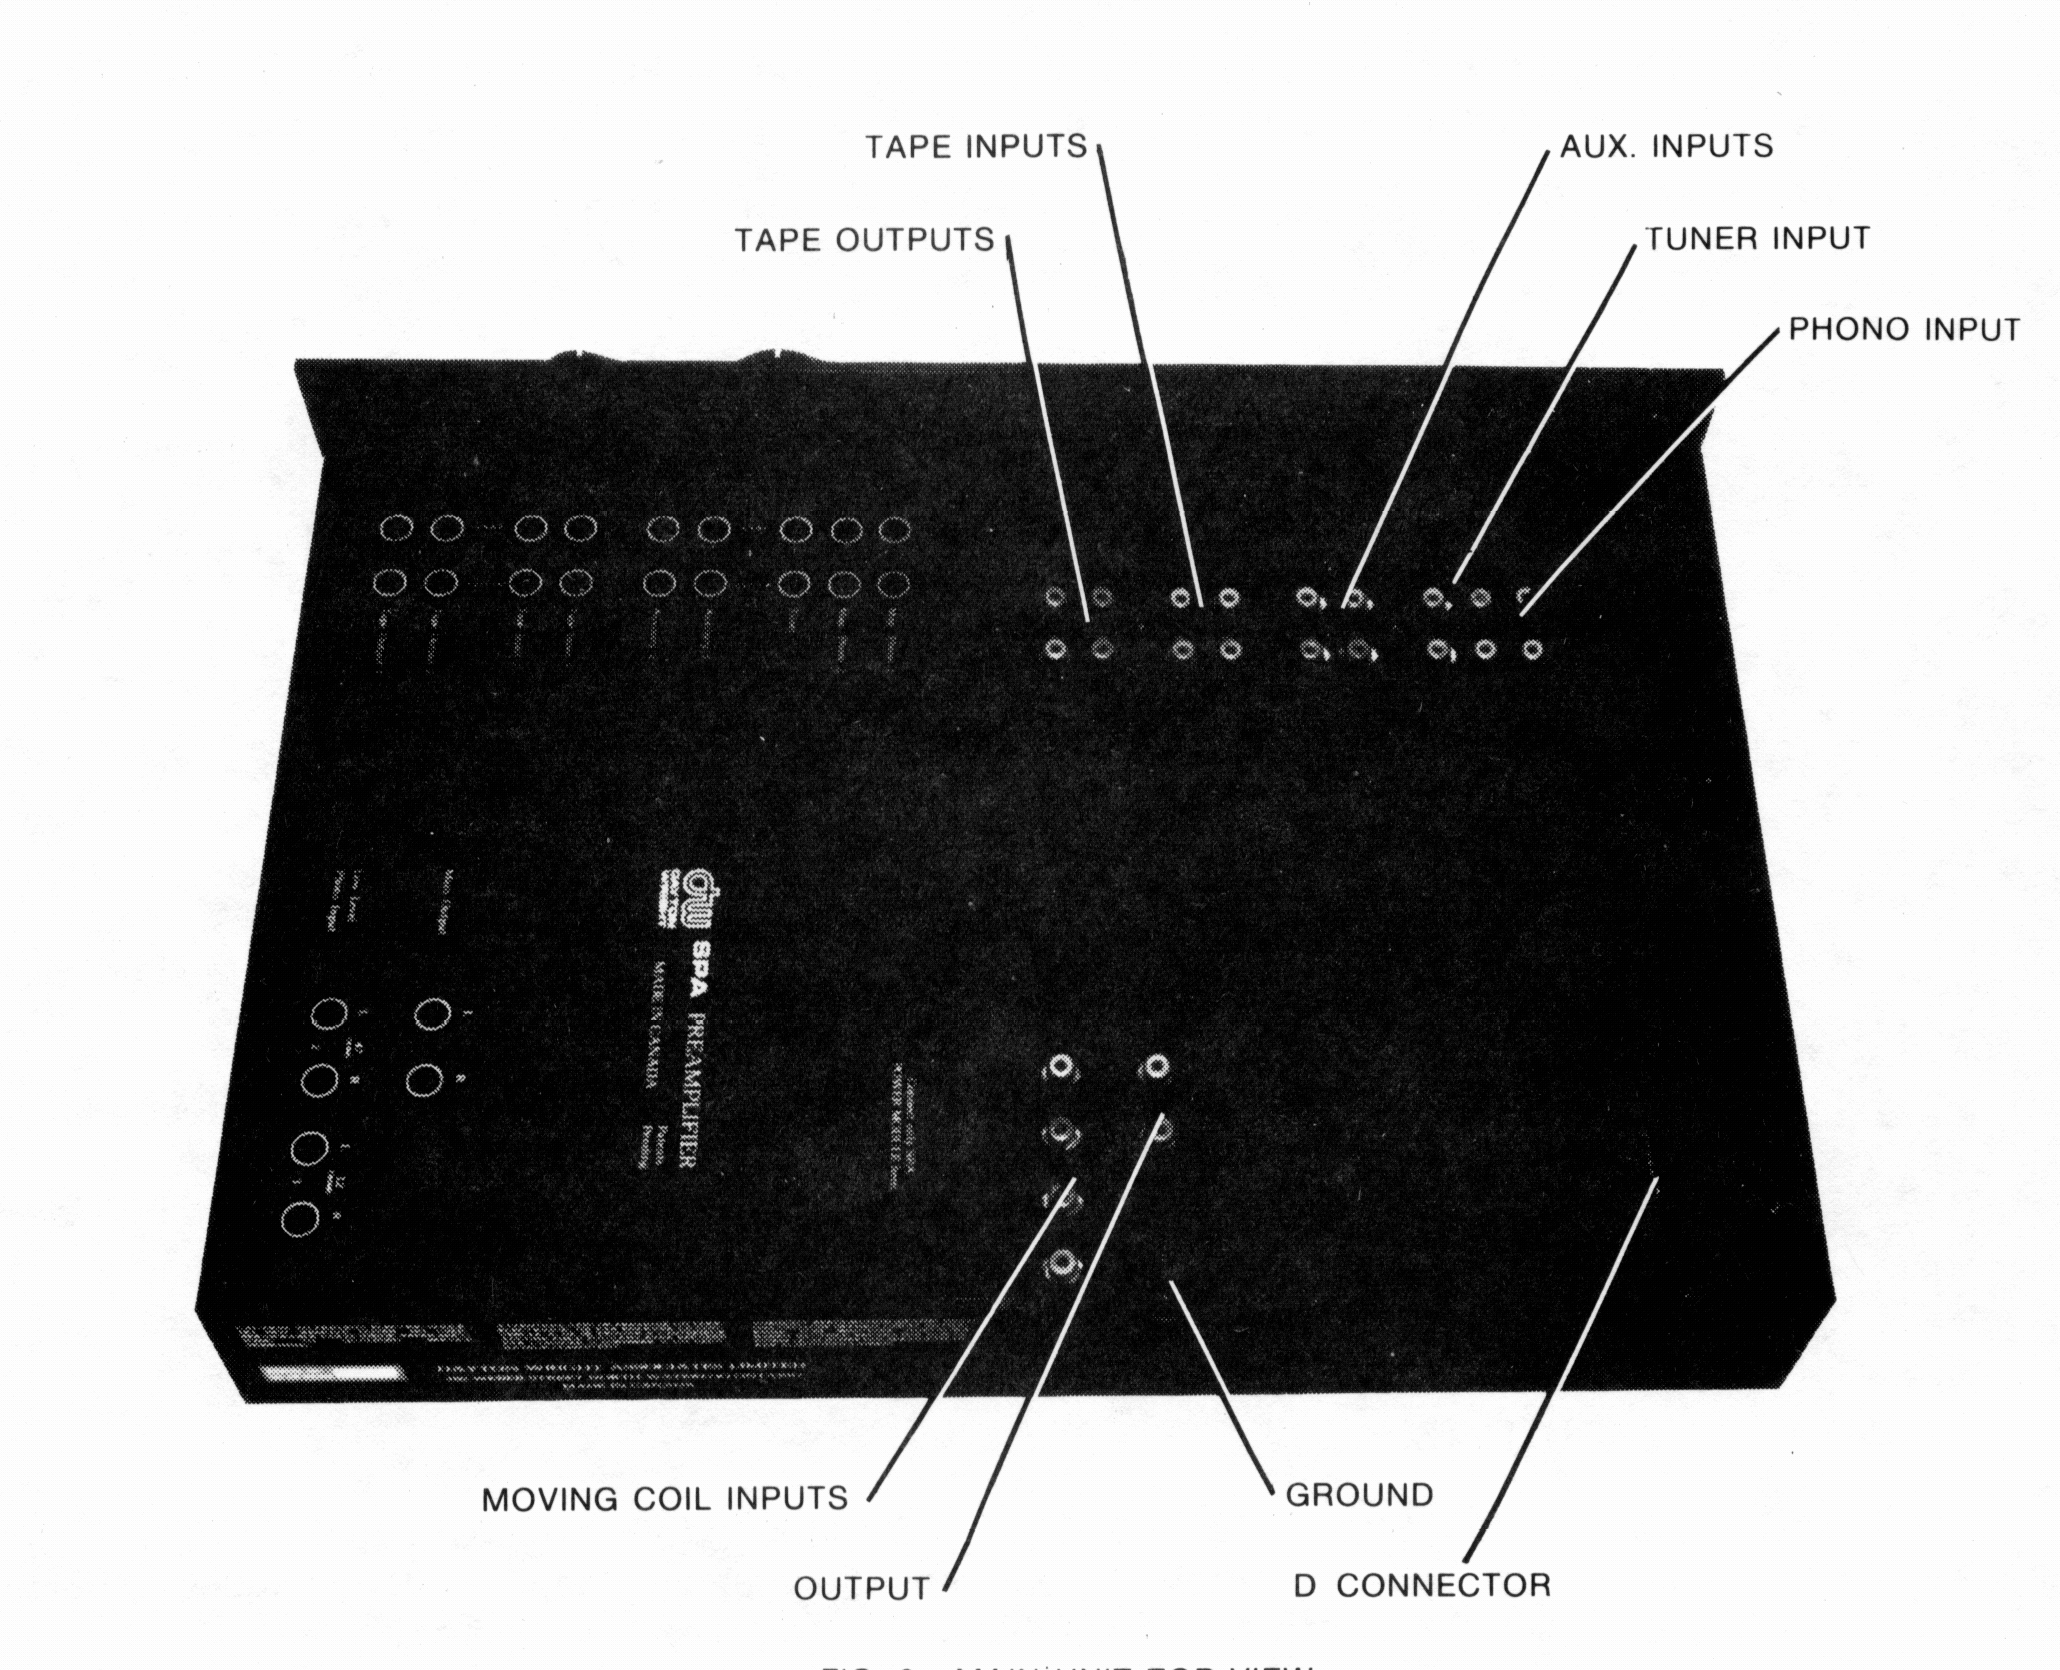
Fig. 3 Main Unit (Top View) 4
3. SPA MAIN UNIT
3.1 POWER CONNECTION
3.1.1 Slide out and remove the plexiglass cover.
3.1.2 Insert the POWER MODULE control cable securely into the D-connector on the MAIN UNIT, located on the left rear side of the recessed area.
3.2 INPUT SELECTOR
NOTE: In order to protect your power amplifier
and loudspeakers, it is good practice to
turn the VOLUME control completely down (counter
clockwise) when depressing any of the INPUT SELECTOR buttons. This
will eliminate the possibility of spurious pulses injected into the high
power associated components.
3.2.1 Moving Coil Phono Inputs
There are two inputs for moving coil phono cartridges. These are
designated "MCl" and "MC2" on the front panel, corresponding to the gold-plated
input sockets at the right rear of the recessed area, designated "Low Level
Phono Input" "1" and "2", respectively. (These inputs were specifically
placed to be near the pre-preamplifier circuitry. Hermetically sealed
mercury thermo-relays pass the signal from the input sockets to the circuit
board. The INPUT SELECTOR buttons merely actuate these mercury relays
with a D.C. voltage. So, contrary to what one might assume, the moving
coil inputs are as close as possible to the actual circuitry, while unwanted
lengths of signal paths to the selector buttons are eliminated.) Insert
the signal carrying cables from tonearms fitted with moving coil cartridges
into these sockets.
In order to extract the desirable qualities of moving coil cartridges,
there are two variables on the SPA which deserve attention. The first
is the termination resistance. MC1 and MC2 differ only in this aspect:
MC1 is terminated by 12 ohms; MC2 by 47
ohms, as marked on the plexiglass cover. However, these terminations,
in conjunction
with your particular moving coil cartridge, will produce different
sonic effects. You
therefore owe it to yourself to try both inputs and determine which
is sonically superior.
All undamped moving coil cartridges ring. Bearing in mind that
MC1 provides more damping than MC2, a cartridge exhibiting harshness in
the high frequencies (dismissing mistracking or other anomalies) would
benefit from MC1.
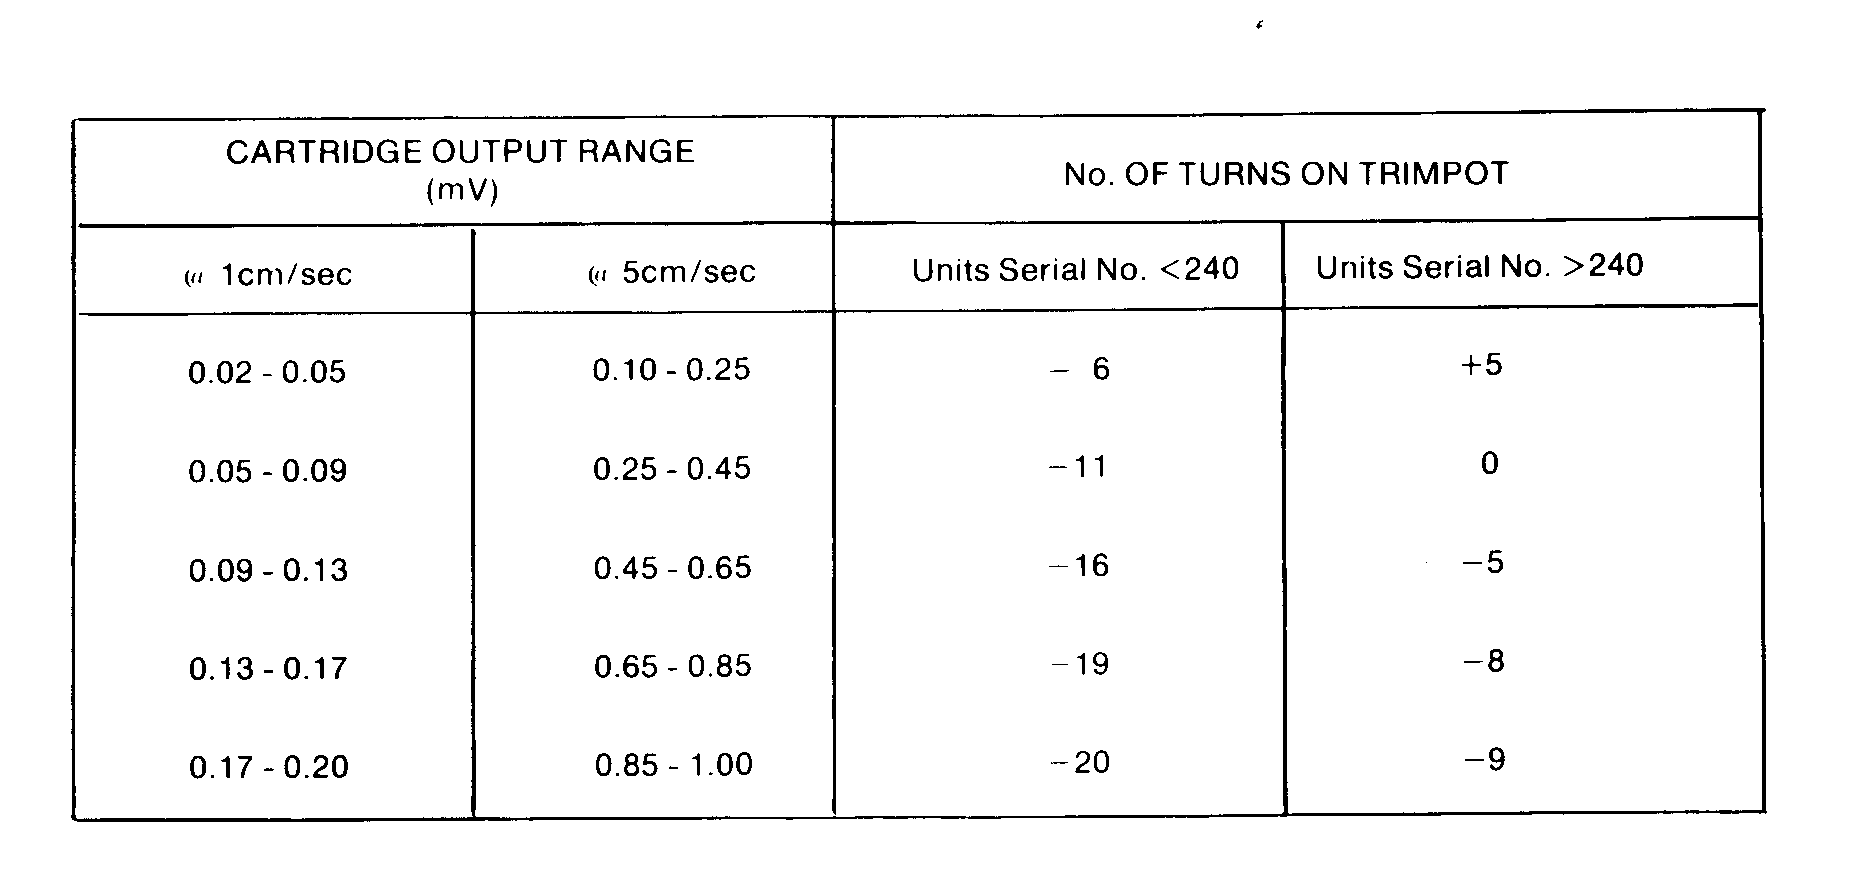
Fig. 4 Trimpot Setting for Headamps
The other variable is the setting of the output trimpots on the pre-preamplifier.
This adjustment matches the sensitivity of the pre-preamplifier to that
of your particular cartridge, allowing for optimum operating ranges of
the preamplifier stages. The trimpots are located down the left side
of the unit on the pre-preamplifier circuit board. They are accessible
through the holes provided. (Some earlier units will require removal of
the bottom plate and inner shield with a 9/64" Allen wrench). The
trimpots are square, grey, and afford about 22 turns (i.e. full revolutions).
Units with Serial No.'s 240 or less were set at maximum (fully clockwise).
Units after No. 240 have been preset at 11 turns (midway). By referring
to the chart below and your moving coil cartridge's specification sheet,
determine the optimum level setting for your cartridge. Note that
two stylus velocities are supplied for five different output ranges.

Fig. 5 Location of Trimpots on Headamp Board 6
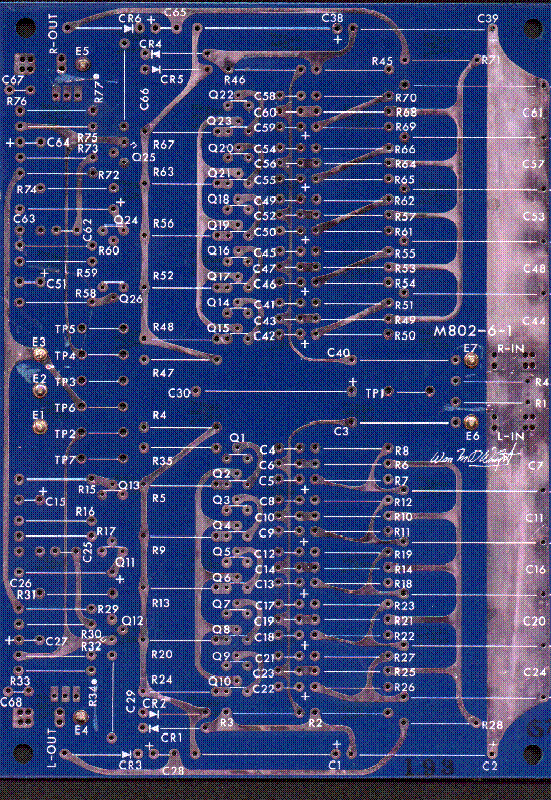
Fig. 5A PrePreamplifier Circuit Board
MAIN SPECIFICATIONS
Generating systein: Moving coil
Output voltage@ 0.3 mV (1 kHz, 50 mr-ti/sec.,
horizontal direction)
Channel sensitivity
difference: 1 dB or less (1 kHz)
Channel separation Over 25 dB (I kHz)
Over 1 5 dB (30 kHz PUF-
1 PU filter used)
Electrical
impedance: 40 SI ±20% (1 kHz)
Compliance: 8 x 10⁻⁶ cm/dyne (on clisc) 25 x 1 0-6 cm/dyne (static)
Stylus tip: Special elliptical stylus
Stylus pressure: 1.8 ±0.3 gr.
Playback fre-
quency response@ 20 to 60,000 Hz
Weight: 7-8 gr.
Recommended
load resistance: 10012 or more (except
when transformer is
provided)
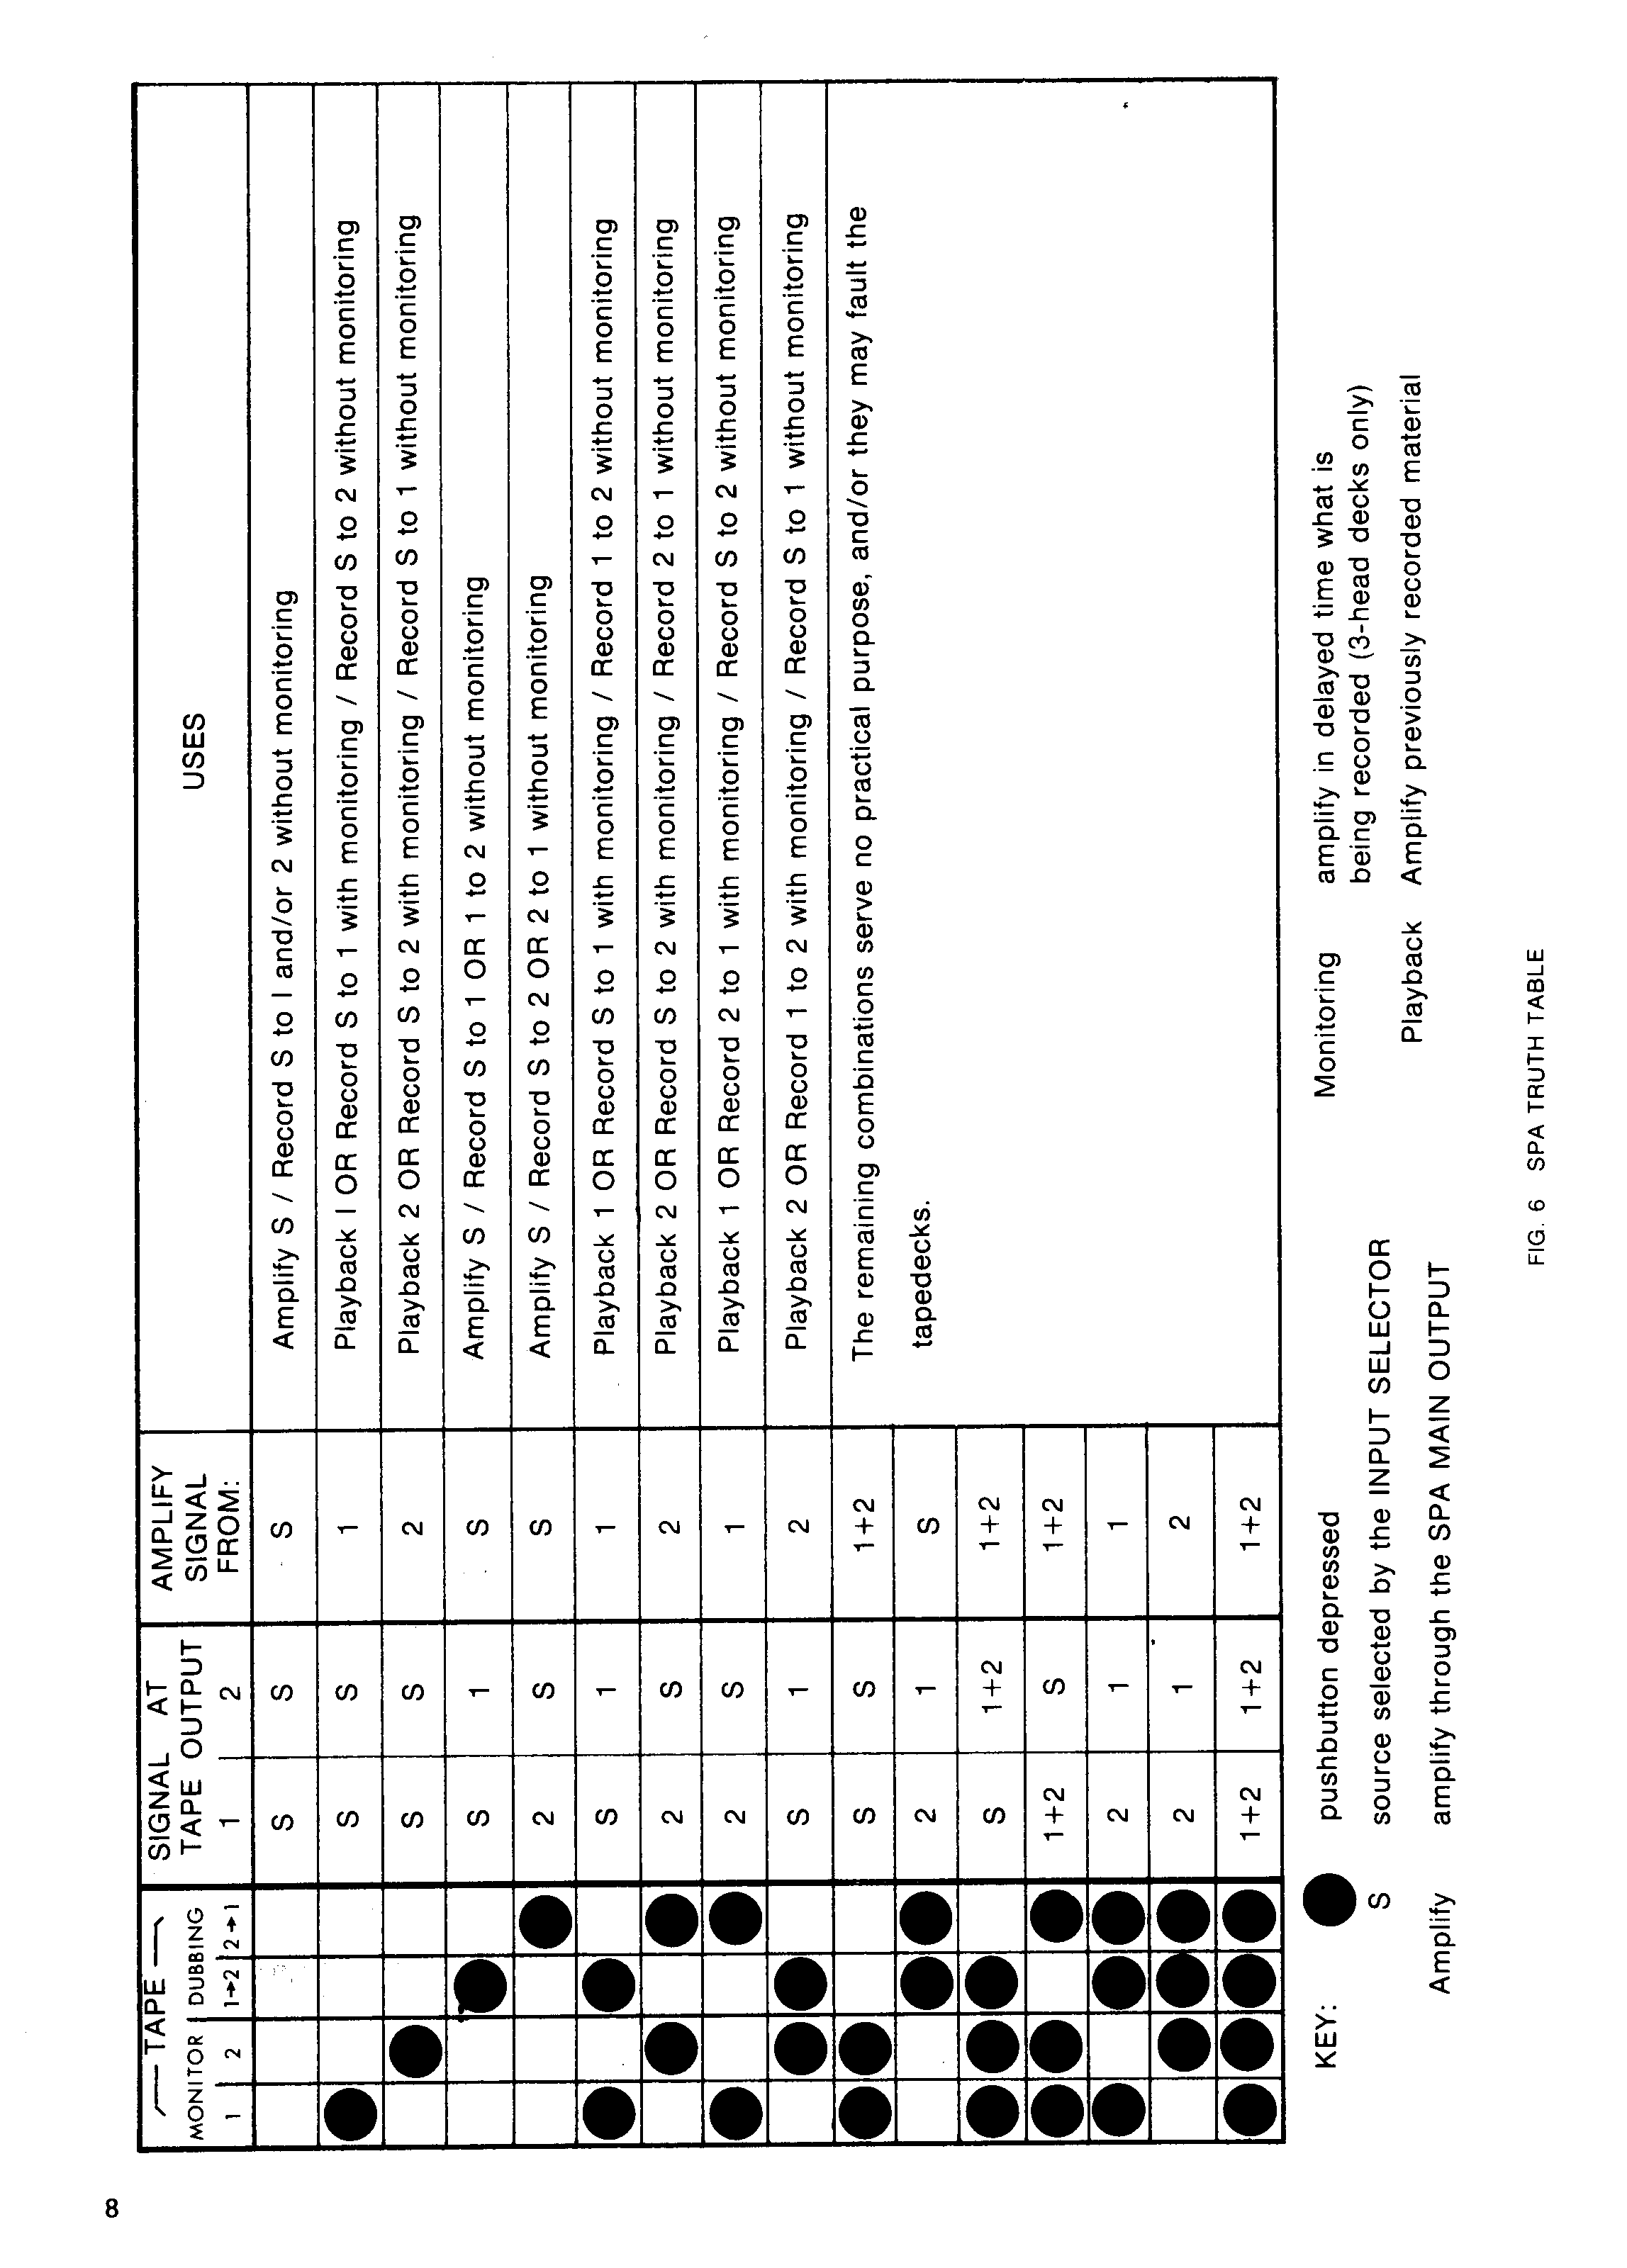
Fig. 6 SPA Truth Table 8
EXAMPLE: Setting the pre-preamplifier trimpots -
Shown above is the specification sheet of a typical moving coil cartridge. The output voltage is rated at 0.3 mV at 50 mm/sec. Since 50 mm = 5 cm, use the 5 cm/sec. column of the CARTRIDGE OUTPUT RANGE on the chart.
The output voltage, 0.3 mV, falls into the "0.25 - 0.45 mV" range. Therefore, if your SPA has a serial #240 or less, you must turn back (counterclockwise) the trimpots 1 1 full turns. Or, if the serial number is greater than #240, no adjustment is required.
3.2.2 Magnetic Phono Cartridges
There are two inputs for magnetic phono cartridges. These are designated "Ml" and "M2" on the front panel, corresponding to the input sockets marked "Mag. Phono 1" and "Mag. Phono 2", respectively, on the plexiglass cover. These two inputs are identical. Insert the signal carrying cables from tonearms fitted with magnetic cartridges into these sockets.
3.2.3 Grounding
The turntables and tonearms may have ground wires. Initially,
secure them to the ground post. Since there are no rules for grounding
which apply to all set-ups, determine by trial and error the grounding
set-up which yields the least hum and noise in your system. (For example,
in certain instances disconnection of the ground wire(s) will decrease
hum in the system.)
3.2.4 Phono Cables
Long leads from tonearms should be avoided, but if they must be used, "off-the-shelf" extension cables are definitely not suggested. The suitable solution is to cut off the cables' phono jacks, extend the cable (or better yet, replace it completely) with a high quality, low capacitance, low resistance cable, and terminate with new, high quality phono jacks.
3.2.5 Tuner and Auxiliary Inputs
These three inputs are identical. One of them is designated "TUNER" for the sake of user convenience only. Connect to these inputs your tuner and other auxiliary ("linelevel") sources (except tapedecks .... these are accomodated by the tape facilities, to be discussed below. A third tape deck, however, could be connected for playback only to an AUXILIARY INPUT). If the tuner is equipped with output level controls, it is appropriate to adjust them for approximately the same output level as that obtained with the phono inputs.
3.3 TAPE
Facilities for two tape decks are provided, featuring extensive monitoring and cross-dubbing combinations. Observe carefully the instructions for input and output connections. Studying the "TRUTH TABLE" will supply the user with the necessary information to yield the greatest flexibility from this section.
3.3.1 Connect the output of the tape deck to "TAPE INPUT 1 " (refer to plexiglass cover) of the preamplifier.
3.3.2 Connect "TAPE OUTPUT 1" of the preamplifier to the INPUT (sometimes designated LINE-IN) of the same tape deck.
3.3.3 If a second tape deck is to be used, repeat the above two steps, this time with "TAPE INPUT 2" and "TAPE OUTPUT 2" of the preamplifier.
3.3.4 Depressing "MONITOR 1" on the front panel will override the INPUT SELECTOR and preamplify the signal being fed into the "TAPE INPUT 1" sockets. Similarly, "MONITOR 2" will preamplify "TAPE INPUT 2".
3.3.5 The TAPE OUTPUT levels of the preamplifier are at "line level" and are not affected by VOLUME, BALANCE, and MODE settings. The TAPE INPUTS of the preamplifier do pass through these controls just as -a selected source would. Therefore, an uninterrupted recording can be made while effecting changes to the monitored signal.
3.3.6 The SPA "TRUTH TABLE" explains in detail the signal routing possibilities with respect to the TAPE pushbuttons. Note that some combinations are not recommended ... their results are included for reference only.
3.4 MUTE
Depressing the "MUTE" pushbutton will reduce the MAIN OUTPUT level by 15dB, regardless of the VOLUME control position. It is convenient to use when the VOLUME control has been pre-set to a particular level.
3.5 MODE
3.5.1 Depressing the "LEFT ONLY" pushbutton will send information of the left channel input to both left and right outputs.
3.5.2 Similarly, depressing the "RIGHT ONLY" pushbutton will send right channel input information to both left and right outputs.
3.5.3 Depressing the "INPUT REV" (reverse) pushbutton crosses the channel's input information: left channel input information is fed to the right channel output, and right channel input information is sent to the left channel output.
3.5.4 Depressing the "MONO (MIX)" pushbutton will parallel left and right channel inputs, resulting in an identical main output for both channels.
3.6 PHONES
The "PHONES" socket on the front panel is to be used with stereo headphone sets of good efficiency and medium to high impedance only. Headsets rated below 600 ohms will clip the SPA into premature protection and severe distortion (this will not damage the SPA). The PHONES output is in parallel with the MAIN OUTPUT; therefore, headphones should be disconnected when using the MAIN OUTPUT (i.e. when operating a connected power amplifier).
3.7 BALANCE AND VOLUME CONTROLS
The potentiometers used for the BALANCE and VOLUME controls of the SPA are hand selected for excellent tracking and smooth, continuous signal transfer. Heavy knurled knobs are custom built at our factory for ease of rotation and positive control.
3.7.1 Rotating the "BALANCE" control to the left or right diminishes the output level of the opposite channel. From the 12 o'clock position, -1 60 degrees of rotation provides only +- 2 dB in level changes. This affords the most scrutinizing balance adjustments. Of course, channel extinction is achieved at the ends of rotation.
3.7.2 The MAIN OUTPUT level is adjusted by the "VOLUME" control. Clockwise rotation increases the level. One may notice this control to feel slightly more positive than the BALANCE control. This is normal, as the VOLUME potentiometer contains four sections, while the BALANCE has two.
3.8 MAIN OUTPUT
The "MAIN OUTPUT" sockets are located in the recessed area toward the rear. Connect them to the power amplifier via high quality phono jacks and cable. See APPENDIX, Section 4.1.
3.9 POWER
3.9.1 The illuminated pushbutton "POWER" switch is located at the right end of the front panel. When depressed, a timing circuit (approx. 15 seconds) flashes the lamp in the switch, indicating that POWER is on and the circuitry is stabilizing to its optimum operating range. During this sequence, the MAIN OUTPUT remains off (i.e. shorted to ground). On completion of the sequence, the lamp will stay on, denoting that the MAIN OUTPUT is on and the SPA preamplifier is ready to function.
3.9.2 With the SPA's timing circuit, you need not worry about
turn-on pulses to your power amplifier should it be on as you depress the
POWER switch on the SPA. (At most, a very small pop will be heard on completion
of the timing sequence). Nonetheless, it is good practice to turn
the preamplifier on first; then, about 20 seconds later, the power amplifier.
Conversely, shut off the power amplifier first; then, about 20 seconds
later, the preamplifier. This is a failsafe method for turning component
systems on and off.
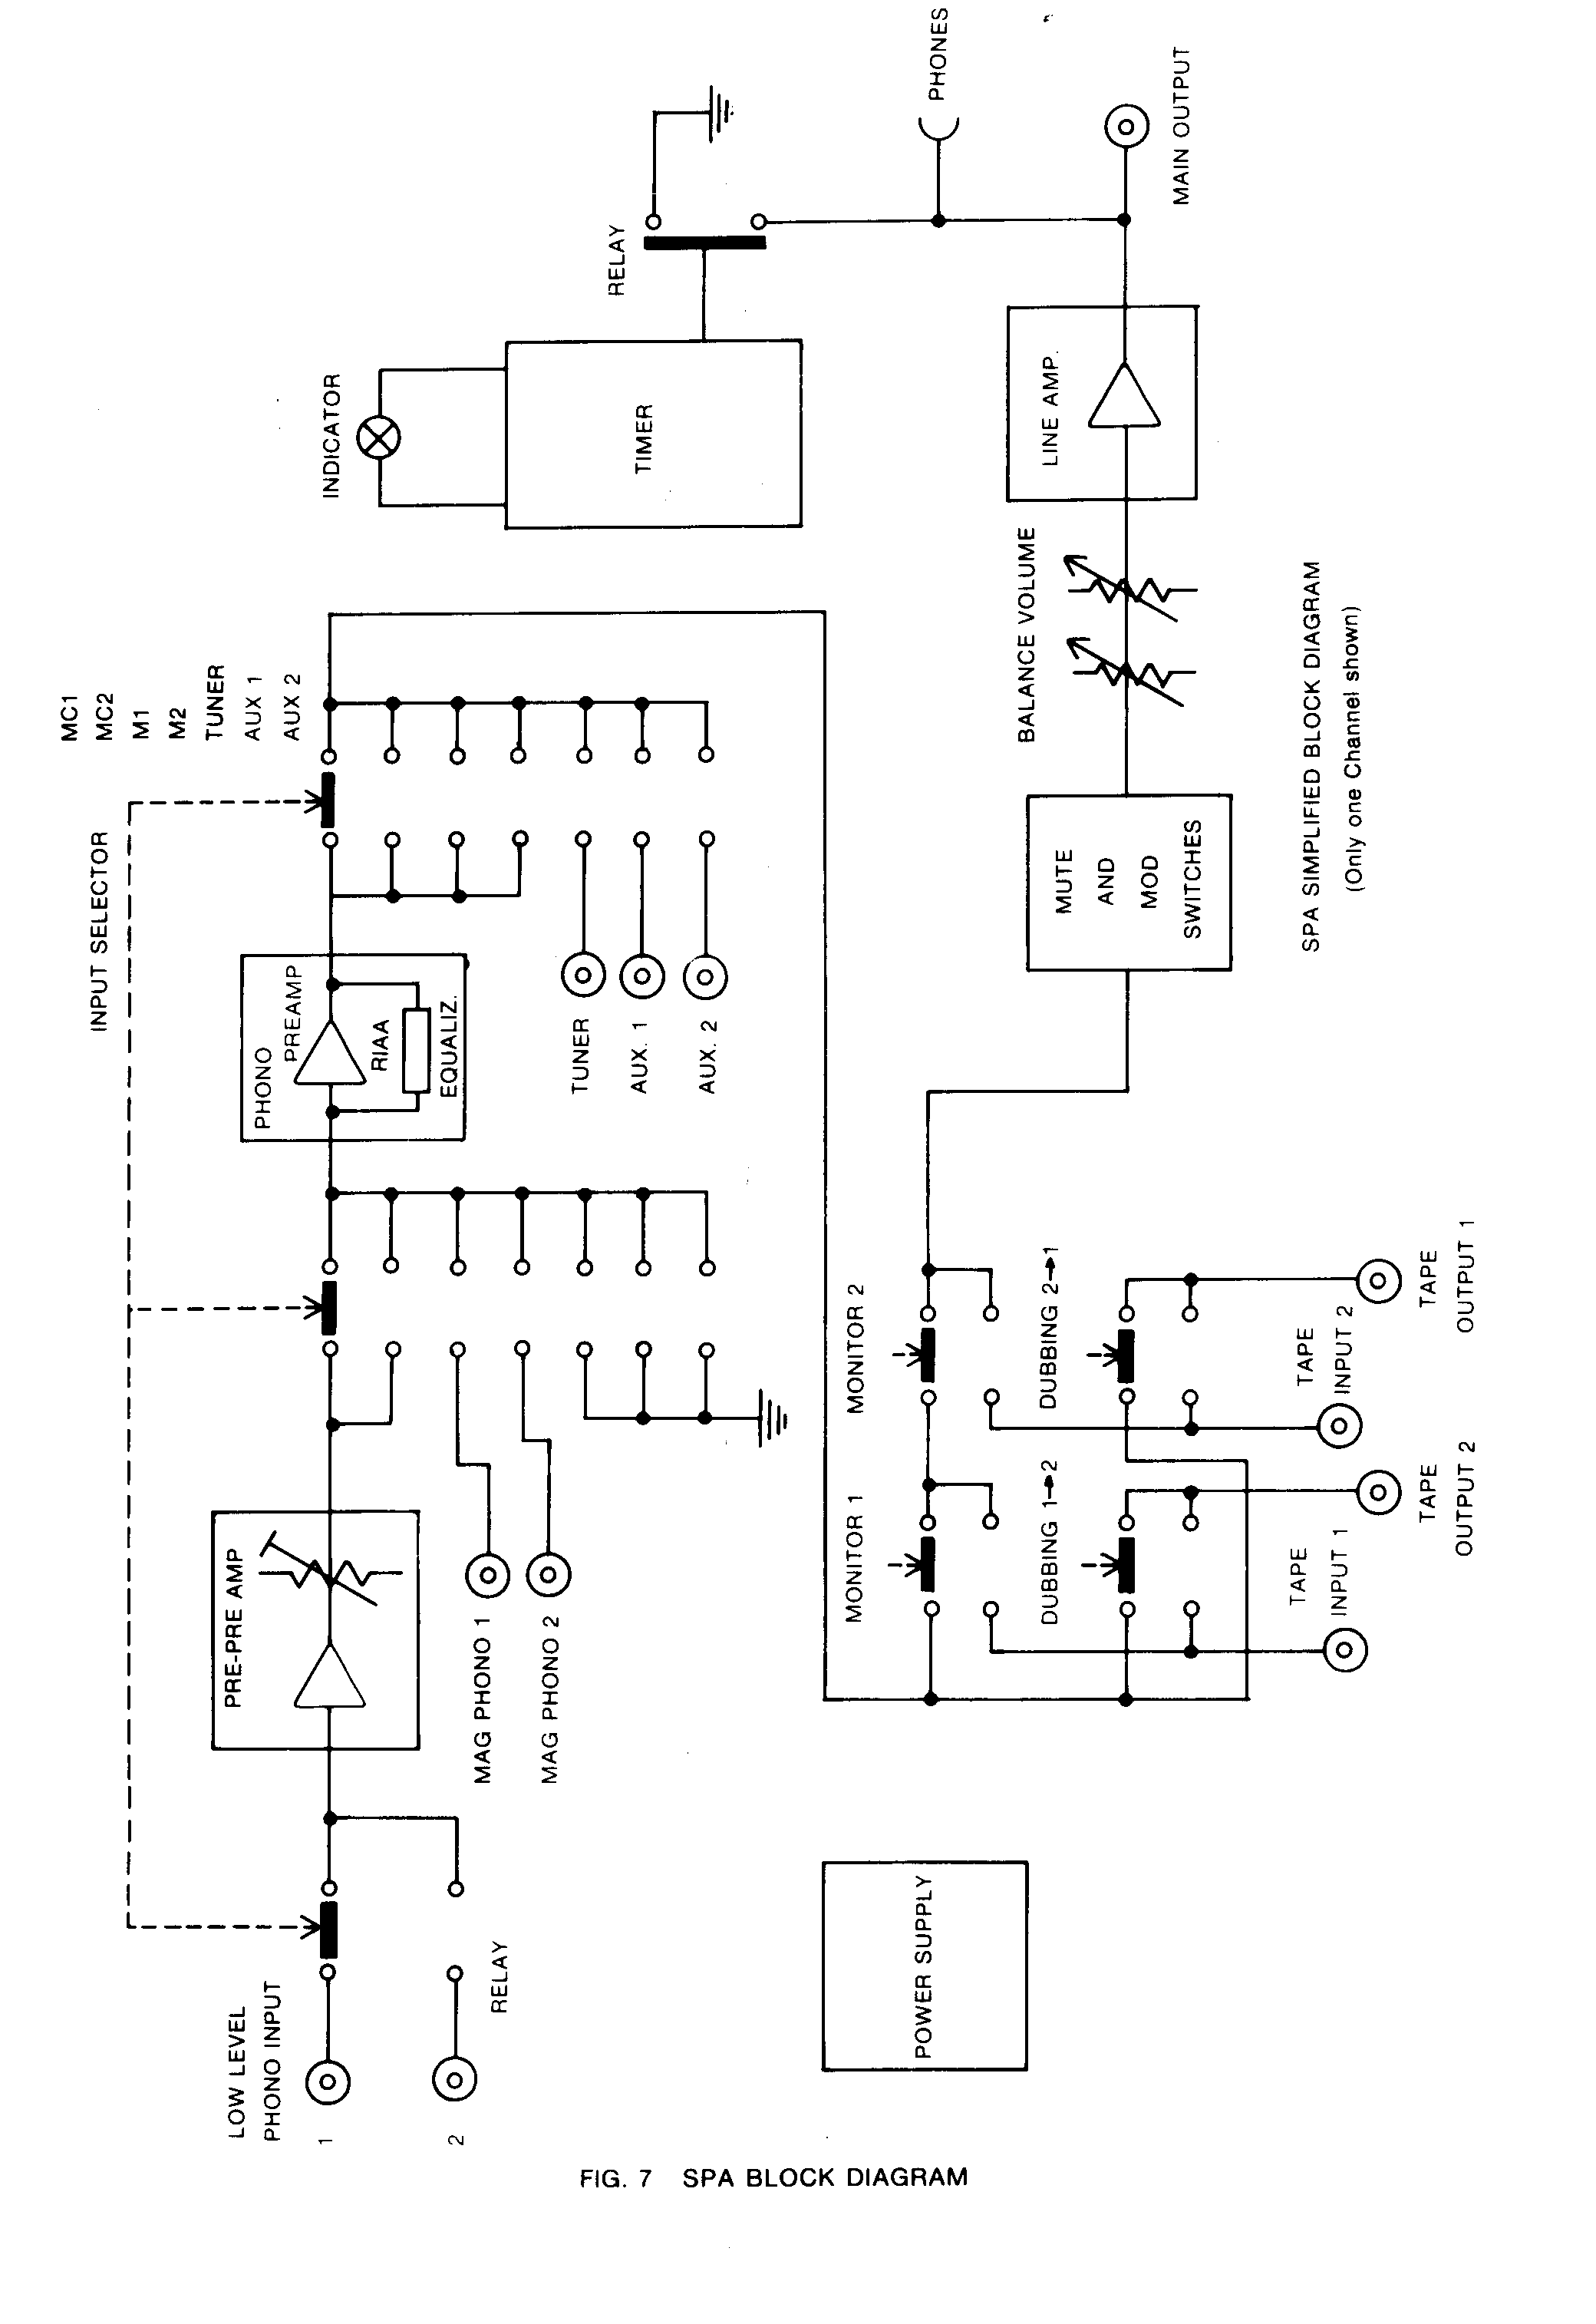
Fig. 7 SPA Block Diagram
4. APPENDIX
4.1 INTERCONNECTING CABLES
The importance of cables cannot be stressed enough. Most "off-the-shelf" audio cables are probably the weakest link in a high fidelity sound system. They invite intermittent problems, hum, noise, RF interference, and can actually decrease overall sound quality even if functioning properly. A few "professional" audio cables are surfacing on the market, offering superior phono jacks and cable, multi-shields, etc. Some are very good, others completely unacceptable - all are costly. Enthusiastic audiophiles can make their own, employing metal phono jacks (preferably with nylon insulation) and a high quality audio cable*. As low as 12 picofarad/foot capacitance cable is now available commercially. If one wants to raise the capacitance slightly to optimize the frequency response of a particular magnetic cartridge, small capacitors can be accommodated inside the phono jack shell. In any case, always check the contact of the phono jack ground shell against the mating socket. Crimp the flanges of the jack slightly to ensure a good contact.
Because of the inherently low impedance of moving coil cartridges, the capacitance of the cable is not as significant as proper shielding and good low resistance electrical connection. The optimum cable for moving coil cartridges is therefore a cable with good shielding and low resistance such as RG58 or RG59.
Speaker wire requirements will vary depending on the amplifier and speakers used. With a difficult speaker load (inductive, capacitive, or very low impedance), the amplifier would probably prefer to see (i.e. it will sound better) some added resistance by using, say, at least 20 feet of 18 gauge lamp cord to each speaker. On the other hand, easily driven loads might yield better results with 10 feet of 14 gauge wire. Varying these parameters affect the VI limiting of the amplifier and, inevitably, the sound quality. *See also SPA MAIN UNIT, Section 3.2.4.
4.2 SYSTEM INSTABILITY
Instability is analogous to microphone feedback encountered in PA systems. Unfortunately, it is usually electronic in nature (as opposed to acoustical) and therefore not quite as easy to detect. High frequency instability will exhibit certain characteristics. These include overall increased distortion, apparent decrease of power or efficiency, overheating and/or shut-down of the power amplifier, and high frequency overload sensitive to increases in volume. All of these conditions may be apparent on one or both channels.
· The problem can often be alleviated by adhering to a few rules
for cable orientation and grounding. Cables carrying different voltage
levels should be kept separate. For example, phono input leads can
be grouped together; line level input leads in another group, preamplifier
output leads in another, and speaker leads in another. Also, where
groups of wire cross each other, cross them at right angles. In this
manner the possibility of
· feedback induced into the more sensitive groups is minimized.
Ensure that there are no ground connections (be it wires or case to case
contact) between the turntable, preamplifier, and power amplifier, save
that of the signal grounds carried in the interconnecting cables and beneficial
turntable/arm ground leads. Of course, A.C. lines should be kept
as far as possible from all other leads. Any other grounds will only
provide a feedback loop for oscillation to occur. Even the ground
pin on the A.C. line cord of a
power amplifier may provide this path, as well as A.C. coupled
loudspeaker systems, lest we forget the infamous "rack mount".
Severe instability problems of an oscillatory nature should be confronted
by monitoring the power amplifier output with an oscilloscope. High
frequency envelopes will demonstrate the presence of instability and the
effectiveness of the above procedures used to eliminate it.
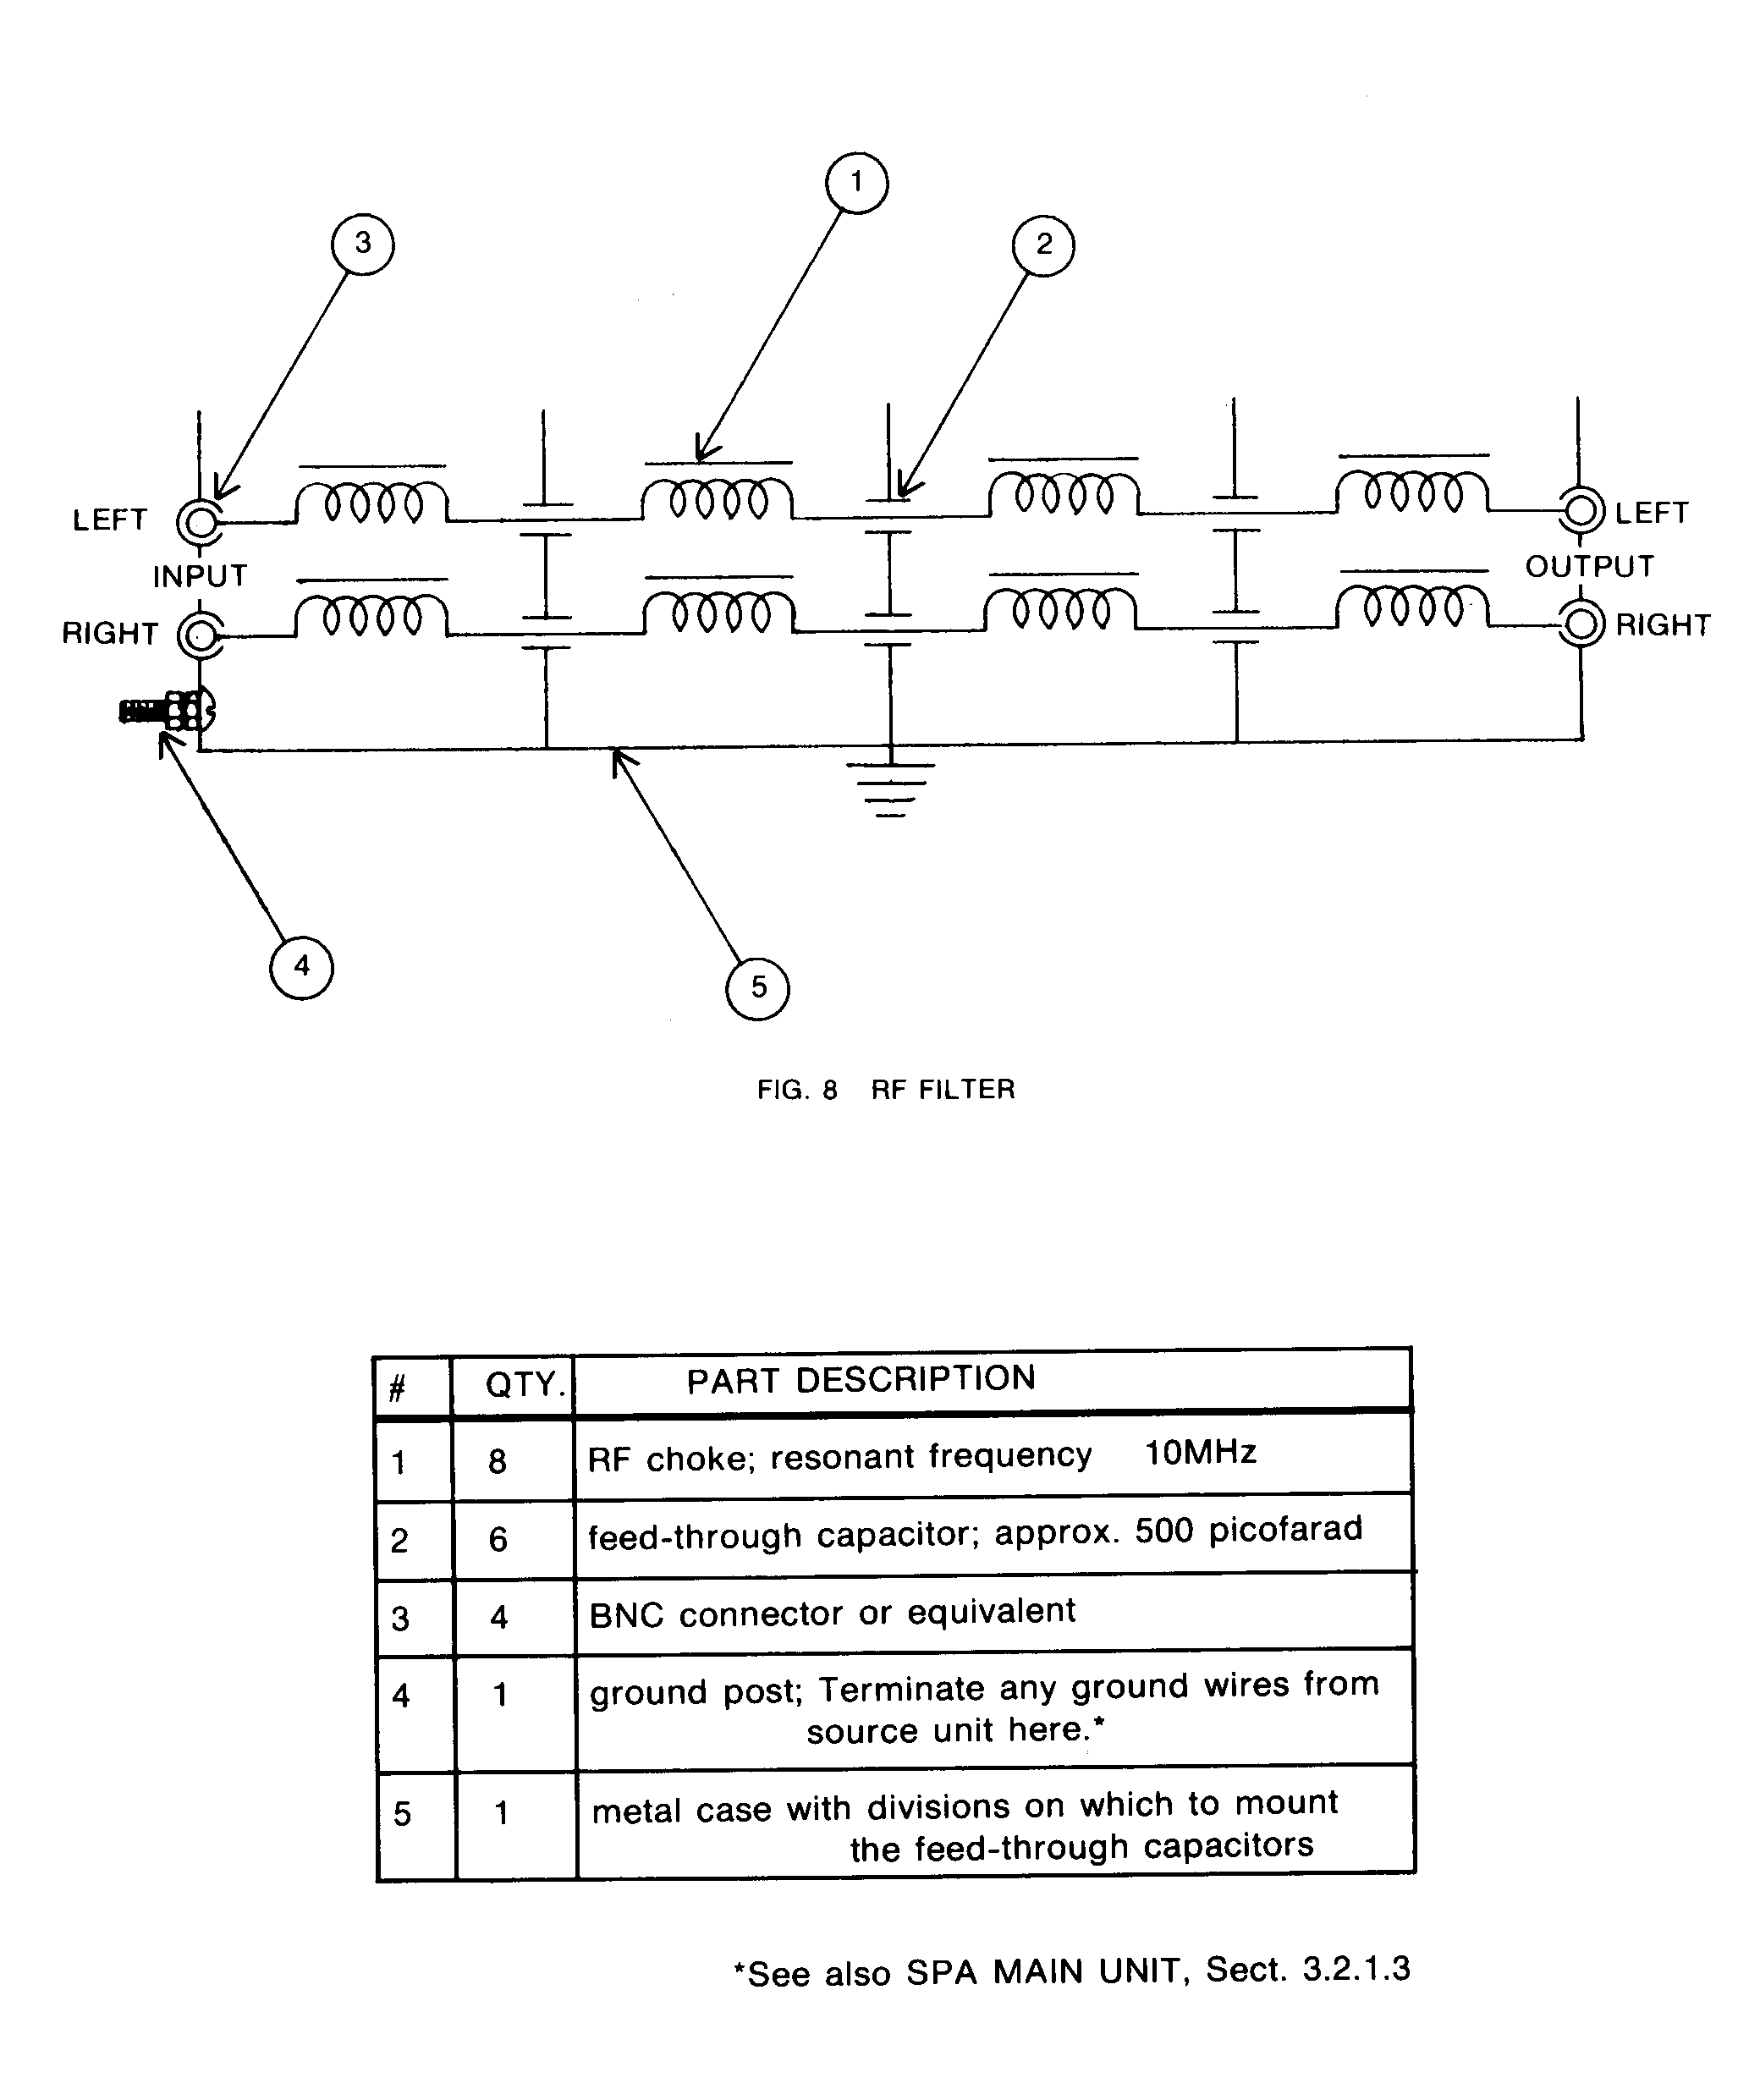
Fig. 8 RF Filter
4.3 HUM, NOISE, AND RF INTERFERENCE
Stray magnetic fields and RF waves, the carriers of unwanted noise sources, are present almost everywhere. Although high-gain, wide bandwidth components are more susceptible to picking up these nuisances, Dayton Wright has designed its circuit configurations to eliminate most of these problems. Furthermore, if set-up procedures recommended in the previous sections of the appendix are followed, the chances of noise pick-up will most likely be extinct.
However, for the seemingly incurable noise problems, there are more steps one may take to alleviate them. An extra layer or two of shielding over interconnecting cables will often solve the problem. The shielding is available as "braided tinned copper" in various diameters. Each cable pair should be fished through the braiding. Do not electrically connect the braid to the signal grounds of the cables. Instead, ground the braid to the case of the unit to which the cables terminate. By determining which input picks up the noise, you need shield only that particular cable pair. Cable and unit orientation is another possible solution. You have already grouped the various levels of cables'. Now, by merely twisting and turning the cables coming from, say, a turntable, hum and RF can disappear completely. Similarly, moving a unit a few inches up or down, or to the sides, can improve the situation 2. When all else fails, an effective RF filter can be constructed in a simple metal case, employing RF chokes and feed-through capacitors in series. (See diagram for an appropriate configuration). This type of filter can be inserted between any source unit and the preamplifier.
See APPENDIX, System Instability.
· See also Placement of the Power Module, Section 2.3.
4.4 THE DAYTON WRIGHT TROUBLESHOOTING FLOW CHART
Locating the source of a problem is often more difficult than correcting the fault itself, considering the fact that so many problems in a system can be traced to poor connections or cables. Therefore, the purpose of this section is not a course on learning how to repair (?) your precious components, but a step by step procedure for tracking down a faulty component or cable. At that point, you will know whether you can correct the problem yourself or not. If you have a malfunctioning or absent channel, this procedure will prove invaluable to you.
The Dayton Wright Troubleshooting Flow Chart tells all, but please read the instructions below before proceeding to the chart itself.

The SPA Flow Chart
HOW TO USE THE FLOW CHART
First make note of the channel (i.e. the loudspeaker) on which the fault occurs. Each trilogy of boxes in the flow chart requires you to cross the channels at a particular stage in the set-up. By observing whether the fault remains on the same loudspeaker, or if it crosses over to the other loudspeaker, you will have either located the fault, or continue on to the next box, respectively. Be sure to cross back the wires to their original position before performing the next trilogy. This will maintain your reference faulty channel.
If the fault occurs only within a particular stage or input of the preamplifier
you may proceed directly to boxes 13, 13B, or 13C, according to the stage
in question (line-level, magnetic phono, or moving coil phono, respectively)
© 1980, 1999 Wright Electroacoustics